Implementation of Page-Object-Model (POM) to Espresso (Native Android Testing) with Kotlin

What is Espresso

Espresso is a native test automation tooling developed by Google for Android UI Tests. Espresso is open-source, very stable, and there are many frameworks that have been developed around Espresso. The Espresso testing framework, provided by the Android Testing Support Library, provides APIs for
writing UI tests to simulate user interactions within a single target app. 
  • It has a full feature-set of Junit that works with Espresso
  • Android Studio provides everything you need
  • It provides white-box testing
  • What Google says about it

Page Object Model (POM)

The main idea behind the Page Object Model (POM) design pattern, is to create an object repository for the pages in the application, which will then be used in the tests. In other words, instead of including the page elements and the test code together within the test, we separate them into 2 different entities: the pages and the test scenarios. Using this concept, each screen in the application will have a corresponding page class. The page classes will identify the elements in the page and contain methods that perform operations on these page elements. 
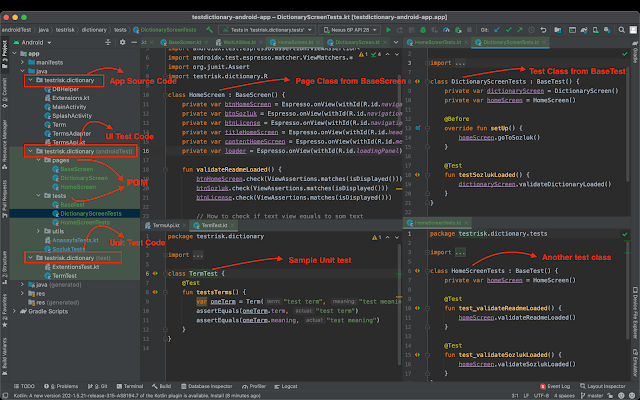
Android - Espresso Page Object Model (POM)


This framework adopts the POM design pattern and is structured as follows:

'Pages' folder
Contains all Page object classes. 
These classes represent the actual screens of the application. A Page Object class will contain a series of objects, representing the application screen, and a series of methods, representing the features of that screen.  

'Tests' folder:
Contains all test classes or scripts.
These classes define the user flow or end-to-end test scenario by referencing the page object class methods.

'Utilities' folder:
Contains helpers, extensions to the Espresso, and scripts.  

How to Write Tests

All page object classes and tests will extend the BasePage or BaseTest, thus inheriting all the base methods. These classes contain common functionality for e.g. setting up the app,  terminating the sessions, or initializing page objects.

1. Create the BaseScreen

2. Create a Screen class named as DictionaryScreen by extending the BaseScreen. Define UI elements via the app using the accessibility identifiers of the elements

3. Create the BaseTest. The BaseTest should handle all the basic things for launching, terminating the app also it should include creating basic test objects for writing tests.

4. Create a test class for the dictonary screen named as DictionaryScreenTests by extending the BaseTest and calling them for the test steps. Test setup should handle all the required actions

Do you want to run these tests in your local and have experience with Espresso for UI tests, Junit test for unit tests, and also overall Android app structure then you are good to go with my repo here: testdictionary-android-app.

Popular posts for software testing and automation

Selenium Error "Element is not currently interactable and may not be manipulated"

Selenium webdriver can drive different browsers like as Firefox, Chrome or Internet Explorer. These browsers actually cover the majority of internet users, so testing these browsers possibly covers the 90% of the internet users. However, there is no guaranty that the same automation scripts can work without a failure on these three browsers. For this reason, automation code should be error-prone for the browsers you want to cover. The following error is caught when the test script run for Chrome and Internet Explorer, but surprisingly there is no error for the Firefox. Selenium gives an error like below: Traceback (most recent call last):   File "D:\workspace\sample_project\sample_run.py", line 10, in <module>     m.login()   File "D:\workspace\ sample_project \test_case_imps.py", line 335, in login     driver.find_element_by_id("id_username").clear()   File "C:\Python27\lib\site-packages\selenium-2.35.0-py2.7.egg\selenium\webdriver\r

Change Default Timeout and Wait Time of Capybara

One of the biggest challenge for automation is handling timeout problem. Most of the time, timeout is 60 seconds but it may sometimes not enough if you have badly designed asynchronous calls or the third party ajax calls. This makes handling timeout more complex. set large enough to tolerate network related problems. For Selenium based automation frameworks, like Capybara, default Webdriver timeout is set to Net::ReadTimeout (Net::ReadTimeout) Changing ReadTimeout If you have timeout problem for Capybara, it gives an error like above. This means that the page is not fully loaded in given timeout period. Even you can see that page is loaded correctly but webdriver wait until the Ajax calls finish. class BufferedIO #:nodoc: internal use only def initialize (io) @io = io @read_timeout = 60 @continue_timeout = nil @debug_output = nil @rbuf = '' end . . . . . def rbuf_fill beg

Create an Alias for Interactive Console Work: Selenium and Capybara

If you are working on shell most of the time Aliases are very helpfull and time saving. For testing purposes you can use Alias for getting ready your test suites. In this post, I want to explain both running Selenium and Capybara on console and creating aliases for each.  This post is for Windows machines, if you are using Unix-like see   this post . Creating Scripts for Selenium and Capybara First of all, it is assumed that you have installed Selenium and Capybara correctly and they work on your machines. If you haven't installed, you can see my previous posts. I am using the Selenium with Python and the Capybara with Ruby. You can use several different language for Selenium but Capybara works only with Ruby.  Create scripts in a directory called scripts (in your home folder, like as  ~/scripts ) for your automation tool as following, save them as capybara.rb, sel.py :  Creating Aliases Depends on your favourite shell, you need to add the alias to .bashrc bash

Page-Object Pattern for Selenium Test Automation with Python

Page-object model is a pattern that you can apply it to develop efficient automation framework. With the page-model, it is possible to minimize maintenance cost. Basically page-object means that your every page is inherited from a base class which includes basic functionalities for every page. If you have some new functionalities that every page should have, you can simple add it to the base class. Base class is like the following: In this part we are creating pages which are inherited from base page. Every page has its own functionalities written as python functions. Some functions return to a new page, it means that these functions leave the current page and produce a new page. You should write as much as functions you need in the assertion part because this is the only part you can use the webdriver functions to interact with web pages . This part can be evaluate as providing data to assertion part.   The last part is related to asserting your test cases against to the

Performance Testing on CI: Locust is running on Jenkins

For a successful Continuous Integration pipeline, there should be jobs for testing the performance of the application. It is necessary if the application is still performing well. Generally performance testing is thought as kinds of activities performed one step before going to live. In general approach it is true but don't forget to test your application's performance as soon as there is an testable software, such as an api end point, functions, and etc. For CI it is a good approach to testing performance after functional testing and just before the deployment of next stage. In this post, I want to share some info about Jenkins and Locust. In my previous post you can find some information about Locust and Jenkins. Jenkins operates the CI environment and Locust is a tool for performance testing. To run the Locust on Jenkins you need command line arguments which control the number of clients ,   hatch rate,  running locust without web interface and there should be so